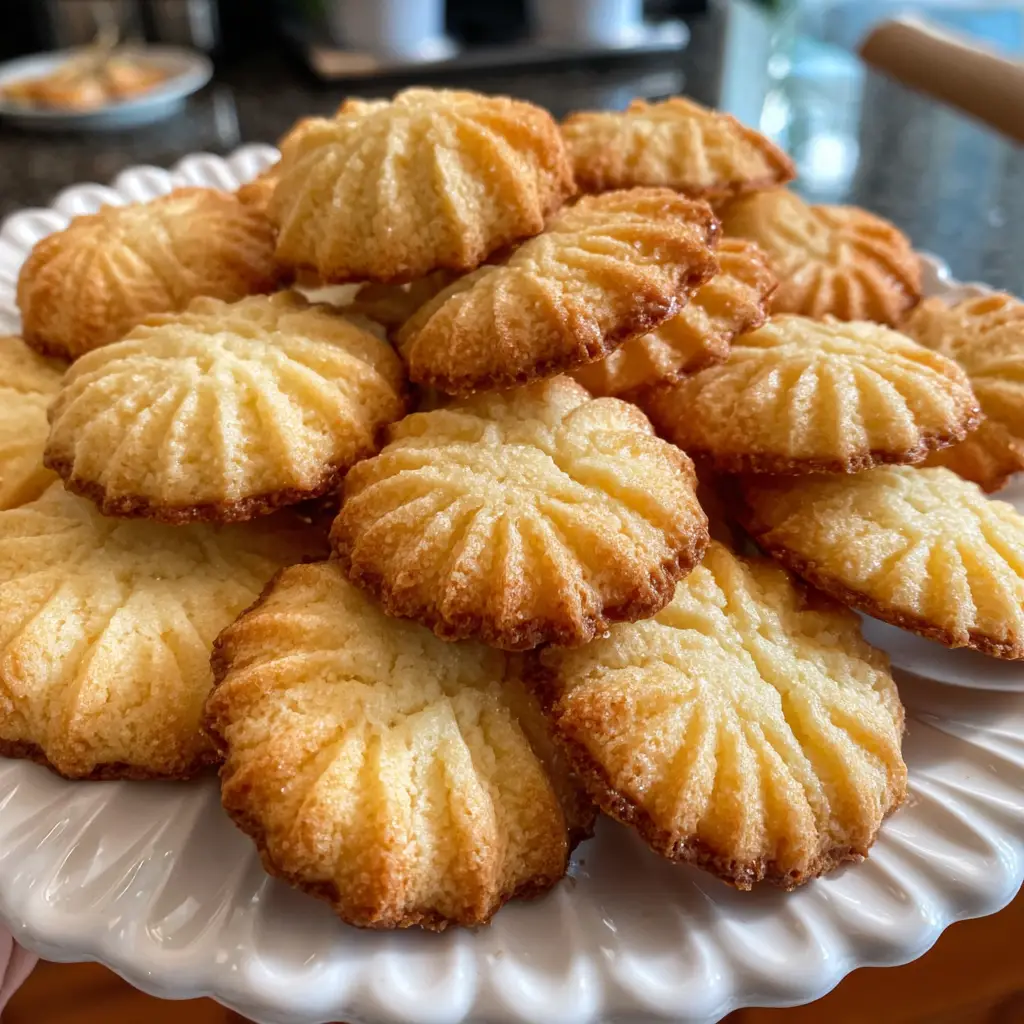
Introduction to Danish Butter Cookies Classic
There’s something magical about the aroma of freshly baked cookies wafting through the house, isn’t there? Danish Butter Cookies Classic are not just any cookies; they are rich, buttery delights that melt in your mouth. Perfect for busy days or special occasions, these cookies are a quick solution to satisfy your sweet cravings. Whether you’re looking to impress your loved ones or simply treat yourself, this recipe is a delightful way to bring a little joy into your day. Trust me, once you try these, you’ll want to make them again and again!
Why You’ll Love This Danish Butter Cookies Classic
These Danish Butter Cookies Classic are a dream come true for busy moms and professionals alike. They come together in just 35 minutes, making them a quick and easy treat. The buttery flavor is simply irresistible, and the melt-in-your-mouth texture will have everyone asking for more. Plus, they’re versatile enough for any occasion, from holiday gatherings to cozy family nights. You’ll love how effortlessly they elevate your dessert game!
Ingredients for Danish Butter Cookies Classic
Gathering the right ingredients is the first step to creating these delightful Danish Butter Cookies Classic. Here’s what you’ll need:
- Unsalted Butter: The star of the show! It gives the cookies their rich, creamy flavor. Make sure it’s softened for easy mixing.
- Granulated Sugar: This sweetener adds just the right amount of sweetness and helps create that lovely texture.
- All-Purpose Flour: The backbone of the cookie dough, providing structure. You can substitute with gluten-free flour if needed.
- Salt: A pinch of salt enhances the flavors, balancing the sweetness beautifully.
- Vanilla Extract: This classic flavor adds warmth and depth to the cookies. Pure vanilla is best, but imitation works too.
- Almond Extract: A little goes a long way! It adds a lovely nutty flavor that complements the vanilla perfectly.
For those who like to get creative, consider adding colored sugar on top for a festive touch before baking. You can find all the exact measurements at the bottom of the article, ready for printing. Happy baking!
How to Make Danish Butter Cookies Classic
Now that you have your ingredients ready, let’s dive into the delightful process of making these Danish Butter Cookies Classic. Follow these simple steps, and you’ll be on your way to cookie heaven!
Step 1: Preheat the Oven
First things first, preheat your oven to 350°F (175°C). This step is crucial because it ensures that your cookies bake evenly. A hot oven helps them rise and develop that lovely golden color. Trust me, you don’t want to skip this part!
Step 2: Cream Butter and Sugar
In a large bowl, cream together the softened butter and granulated sugar until the mixture is light and fluffy. This process usually takes about 3-5 minutes. The right texture is key here; it creates air pockets that make your cookies tender and melt-in-your-mouth delicious. So, take your time and enjoy the process!
Step 3: Add Extracts
Next, it’s time to add the vanilla and almond extracts. These extracts are the secret weapons in your cookie arsenal! They enhance the flavor, making each bite a delightful experience. Mix them in well, and let those wonderful aromas fill your kitchen.
Step 4: Combine Dry Ingredients
Now, gradually add the all-purpose flour and salt to the wet mixture. It’s important to mix until just combined. Overmixing can lead to tough cookies, and we definitely want them to be soft and buttery. So, gently fold the flour in until you don’t see any dry bits.
Step 5: Pipe the Dough
Using a cookie press or piping bag, pipe the dough onto ungreased baking sheets. If you’re using a cookie press, it’s like a fun little art project! Aim for uniform shapes, but don’t stress too much about perfection. Each cookie will have its own charm!
Step 6: Bake the Cookies
Pop those trays into the oven and bake for 12-15 minutes. Keep a close eye on them! You want the edges to be lightly golden, while the centers remain soft. The smell wafting through your home will be absolutely irresistible!
Step 7: Cool and Store
Once baked, allow the cookies to cool on the baking sheets for a few minutes. This helps them firm up a bit. Then, transfer them to wire racks to cool completely. To keep them fresh, store your cookies in an airtight container. They’ll stay delicious for days—if they last that long!
Tips for Success
- Make sure your butter is softened to room temperature for easy mixing.
- Use a kitchen scale for precise measurements, especially for flour.
- Chill the dough for 15 minutes if it feels too soft to pipe.
- Experiment with different shapes using your cookie press for fun variations.
- Don’t skip the cooling step; it helps maintain the cookie’s texture.
Equipment Needed
- Mixing Bowl: A large bowl for creaming butter and sugar. Any size will do!
- Electric Mixer: A hand mixer or stand mixer makes creaming easier, but a whisk works too.
- Cookie Press or Piping Bag: For shaping the cookies. A zip-top bag with a corner cut can substitute.
- Baking Sheets: Use ungreased sheets or line with parchment paper for easy cleanup.
- Wire Rack: Essential for cooling cookies. A plate can work in a pinch!
Variations of Danish Butter Cookies Classic
- Chocolate-Dipped: Melt some dark or white chocolate and dip half of each cookie for a decadent twist.
- Citrus Zest: Add a teaspoon of lemon or orange zest to the dough for a refreshing citrus flavor.
- Nutty Delight: Incorporate chopped nuts like almonds or pecans into the dough for added crunch and flavor.
- Spiced Version: Mix in a pinch of cinnamon or nutmeg for a warm, spiced cookie perfect for the holidays.
- Gluten-Free: Substitute all-purpose flour with a gluten-free blend to accommodate dietary needs.
Serving Suggestions for Danish Butter Cookies Classic
- Pair these cookies with a warm cup of tea or coffee for a cozy afternoon treat.
- Serve them on a decorative platter for a beautiful presentation at gatherings.
- For a festive touch, arrange them in a holiday tin as a thoughtful gift.
- Enjoy with a scoop of vanilla ice cream for a delightful dessert experience.
- Sprinkle powdered sugar on top for an elegant finishing touch.
FAQs about Danish Butter Cookies Classic
As you embark on your baking adventure with Danish Butter Cookies Classic, you might have a few questions. Here are some common queries that can help you along the way:
Can I use salted butter instead of unsalted?
While unsalted butter is preferred for precise control over the saltiness, you can use salted butter. Just reduce the added salt in the recipe to avoid overly salty cookies.
How should I store my Danish Butter Cookies Classic?
To keep your cookies fresh, store them in an airtight container at room temperature. They can last up to a week, but I bet they won’t last that long!
Can I freeze these cookies?
Absolutely! These cookies freeze beautifully. Just place them in a single layer in an airtight container, and they’ll stay fresh for up to three months. Perfect for those unexpected guests!
What can I do if my dough is too soft to pipe?
If your dough feels too soft, chill it in the refrigerator for about 15 minutes. This will firm it up, making it easier to pipe into beautiful shapes.
Can I add chocolate chips to the dough?
Yes! Adding chocolate chips can give your Danish Butter Cookies Classic a delightful twist. Just fold them in gently after mixing the dry ingredients.
Final Thoughts
Baking Danish Butter Cookies Classic is more than just a recipe; it’s an experience filled with warmth and joy. The rich, buttery aroma that fills your kitchen creates a cozy atmosphere, perfect for sharing with family and friends. Each bite transports you to a place of comfort, reminding you of cherished moments. Whether you’re enjoying them with a cup of tea or gifting them to loved ones, these cookies bring smiles all around. So, roll up your sleeves, embrace the process, and let these delightful treats become a beloved part of your baking tradition!
Print
Danish Butter Cookies Classic: Indulge in Pure Delight!
- Prep Time: 20 minutes
- Cook Time: 15 minutes
- Total Time: 35 minutes
- Yield: 24 cookies 1x
- Category: Dessert
- Method: Baking
- Cuisine: Danish
- Diet: Vegetarian
Description
Danish Butter Cookies Classic are rich, buttery cookies that melt in your mouth, perfect for any occasion.
Ingredients
- 1 cup unsalted butter, softened
- 1 cup granulated sugar
- 2 cups all-purpose flour
- 1/2 teaspoon salt
- 1 teaspoon vanilla extract
- 1/2 teaspoon almond extract
Instructions
- Preheat your oven to 350°F (175°C).
- In a large bowl, cream together the softened butter and sugar until light and fluffy.
- Add the vanilla and almond extracts, mixing well.
- Gradually add the flour and salt, mixing until just combined.
- Using a cookie press or piping bag, pipe the dough onto ungreased baking sheets.
- Bake for 12-15 minutes or until the edges are lightly golden.
- Allow to cool on the baking sheets for a few minutes before transferring to wire racks to cool completely.
Notes
- For a festive touch, sprinkle colored sugar on top before baking.
- Store in an airtight container to maintain freshness.
- These cookies can be frozen for up to 3 months.
Nutrition
- Serving Size: 1 cookie
- Calories: 100
- Sugar: 5g
- Sodium: 50mg
- Fat: 6g
- Saturated Fat: 4g
- Unsaturated Fat: 2g
- Trans Fat: 0g
- Carbohydrates: 10g
- Fiber: 0g
- Protein: 1g
- Cholesterol: 20mg