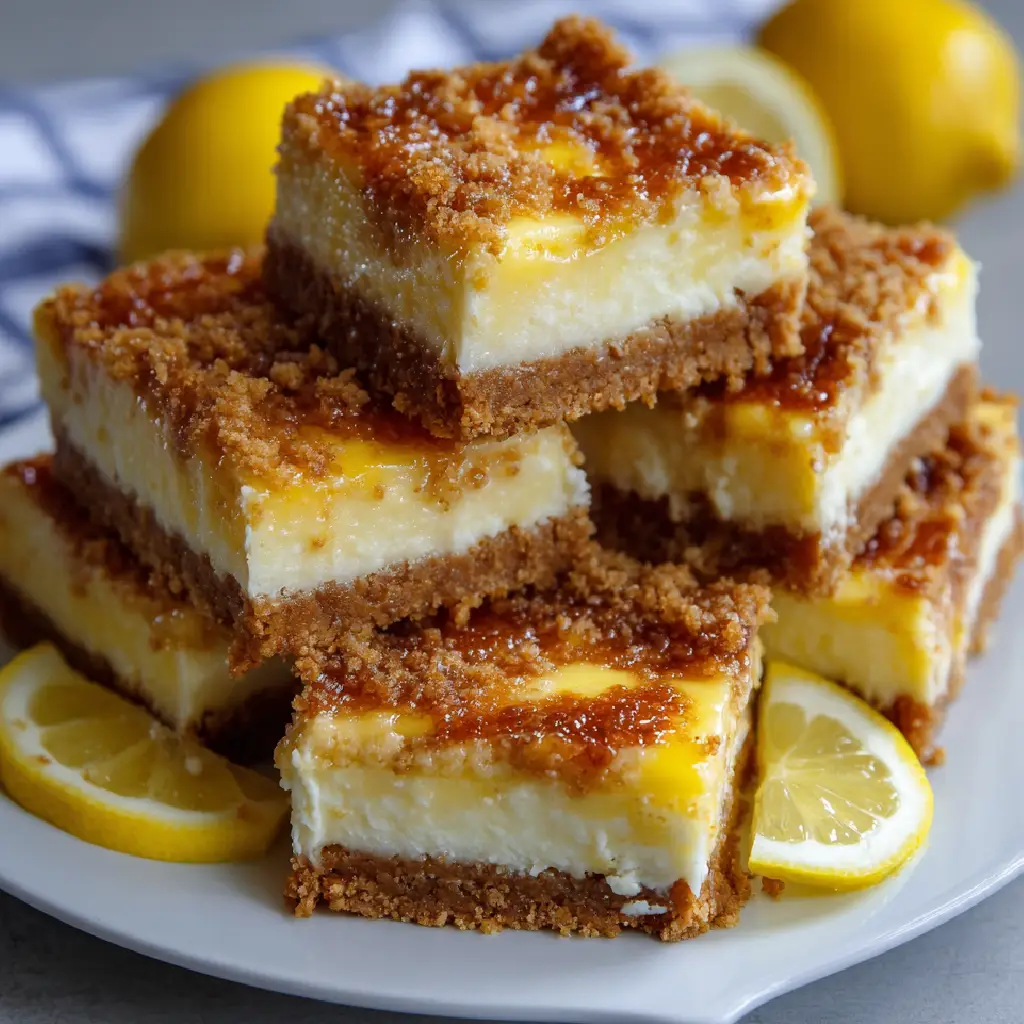
Introduction to Best Lemon Marbled Cheesecake Bars
Welcome to a slice of sunshine! If you’re looking for the *Best Lemon Marbled Cheesecake Bars*, you’ve come to the right place. These delightful treats are not just a dessert; they’re a quick solution for those busy days when you want to impress your family or friends without spending hours in the kitchen. With their creamy texture and zesty lemon flavor, they’re sure to brighten up any gathering. Trust me, once you make these bars, they’ll become a go-to recipe that everyone will love. Let’s dive into this delicious adventure together!
Why You’ll Love This Best Lemon Marbled Cheesecake Bars
These *Best Lemon Marbled Cheesecake Bars* are a dream come true for busy moms and professionals alike. They’re incredibly easy to whip up, taking just a little over an hour from start to finish. The combination of creamy cheesecake and zesty lemon creates a flavor explosion that’s simply irresistible. Plus, they can be made ahead of time, making them perfect for last-minute gatherings or a sweet treat after dinner. You’ll love how they brighten your day!
Ingredients for Best Lemon Marbled Cheesecake Bars
Gathering the right ingredients is the first step to creating these heavenly *Best Lemon Marbled Cheesecake Bars*. Here’s what you’ll need:
- Graham cracker crumbs: These form the buttery crust that holds everything together. You can crush your own or buy pre-made crumbs for convenience.
- Unsalted butter: This adds richness to the crust. Using unsalted allows you to control the saltiness of the bars.
- Cream cheese: The star of the show! It gives the cheesecake its creamy texture. Make sure it’s softened for easy mixing.
- Granulated sugar: This sweetens the filling, balancing the tartness of the lemon. You can substitute with a sugar alternative if desired.
- Eggs: They help bind the ingredients together and create a smooth, rich filling. Use large eggs for best results.
- Vanilla extract: A splash of this adds depth to the flavor. Pure vanilla is always best, but imitation works in a pinch.
- Sour cream: This adds a tangy flavor and creaminess to the filling. Greek yogurt can be a great substitute if you’re looking for a lighter option.
- Fresh lemon juice: The key to that zesty flavor! Freshly squeezed juice is always better than bottled for a vibrant taste.
- Lemon zest: This enhances the lemon flavor and adds a lovely aroma. Don’t skip it if you want that extra zing!
For exact measurements, check the bottom of the article where you can find everything listed for easy printing. Happy baking!
How to Make Best Lemon Marbled Cheesecake Bars
Now that we have our ingredients ready, let’s dive into the fun part: making the *Best Lemon Marbled Cheesecake Bars*! Follow these simple steps, and you’ll be on your way to a delicious dessert that will wow your family and friends.
Step 1: Preheat the Oven
First things first, preheat your oven to 325°F (160°C). Preheating is crucial because it ensures even baking. If you skip this step, your cheesecake bars might not set properly. So, let that oven warm up while you prepare the crust!
Step 2: Prepare the Crust
In a mixing bowl, combine your graham cracker crumbs and melted butter. Stir until everything is well mixed. The mixture should resemble wet sand. Now, press this mixture firmly into the bottom of a greased 9×13 inch baking dish. Pressing it down well is key; it creates a sturdy base for your cheesecake filling.
Step 3: Make the Cheesecake Filling
In a large mixing bowl, beat the softened cream cheese and granulated sugar together until smooth. This step is essential for a creamy texture. Next, add the eggs one at a time, mixing well after each addition. This helps to incorporate air, making your cheesecake light and fluffy.
Step 4: Combine Ingredients
Now it’s time to add the flavor! Stir in the vanilla extract, sour cream, fresh lemon juice, and lemon zest. Mix until everything is well combined. The lemon juice and zest will give your cheesecake that refreshing zing. Trust me, you’ll want to savor every bite!
Step 5: Layer the Mixture
Pour half of the cheesecake mixture over the crust, spreading it evenly. Then, drop spoonfuls of the remaining mixture on top. Using a knife, gently swirl the top to create a marbled effect. This not only looks beautiful but also adds a delightful mix of flavors in every bite.
Step 6: Bake
Place your baking dish in the preheated oven and bake for 30-35 minutes. Keep an eye on it! The center should be set but still slightly jiggly. If it’s too wobbly, give it a few more minutes. Overbaking can lead to cracks, and we want smooth, creamy bars!
Step 7: Cool and Refrigerate
Once baked, remove the dish from the oven and let it cool at room temperature. After it’s cooled, refrigerate for at least 4 hours before cutting into bars. Chilling allows the flavors to meld beautifully and makes slicing easier. Patience is key here, but oh, is it worth it!
Tips for Success
- Use room temperature cream cheese for a smoother filling.
- Don’t skip the chilling time; it enhances the flavor and texture.
- For a cleaner cut, use a sharp knife and wipe it between slices.
- Experiment with different citrus zest for a unique twist.
- Keep an eye on the baking time to avoid overcooking.
Equipment Needed
- 9×13 inch baking dish: A standard size for these bars. You can use a glass or metal dish.
- Mixing bowls: A set of various sizes will help with mixing ingredients.
- Electric mixer: A hand mixer or stand mixer makes beating the cream cheese easier.
- Spatula: Perfect for spreading the cheesecake mixture evenly.
- Knife: A sharp knife is essential for cutting the bars cleanly.
Variations
- Berry Swirl: Add a swirl of raspberry or blueberry puree for a fruity twist. Just drop spoonfuls on top and swirl like you did with the cheesecake mixture.
- Chocolate Drizzle: Melt some dark chocolate and drizzle it over the cooled bars for a decadent touch. Chocolate and lemon are a surprisingly delightful combo!
- Gluten-Free Option: Substitute graham cracker crumbs with gluten-free cookies or almond flour for a gluten-free crust.
- Vegan Version: Use vegan cream cheese, coconut cream, and a flax egg to create a plant-based version of these bars.
- Herbal Infusion: Add a hint of fresh mint or basil to the filling for a refreshing herbal note that complements the lemon beautifully.
Serving Suggestions
- Pair these *Best Lemon Marbled Cheesecake Bars* with a dollop of whipped cream for extra creaminess.
- Serve alongside fresh berries like strawberries or blueberries for a pop of color and flavor.
- For drinks, consider iced tea or lemonade to complement the lemony goodness.
- Garnish with a sprinkle of lemon zest or mint leaves for a beautiful presentation.
FAQs about Best Lemon Marbled Cheesecake Bars
Can I use bottled lemon juice instead of fresh?
While bottled lemon juice is convenient, fresh lemon juice gives a brighter, more vibrant flavor. If you can, opt for fresh lemons for the best results in your *Best Lemon Marbled Cheesecake Bars*.
How do I store leftover cheesecake bars?
Store any leftovers in an airtight container in the refrigerator. They’ll stay fresh for up to five days. Just remember to let them come to room temperature before serving for the best taste!
Can I freeze these cheesecake bars?
Absolutely! These bars freeze well. Just wrap them tightly in plastic wrap and then in aluminum foil. They can be frozen for up to three months. Thaw them in the fridge overnight before serving.
What can I substitute for sour cream?
If you’re looking for a substitute, Greek yogurt works wonderfully in place of sour cream. It will still give you that creamy texture and tangy flavor in your *Best Lemon Marbled Cheesecake Bars*.
Can I make these bars ahead of time?
Yes! In fact, making them a day in advance enhances the flavors. Just be sure to refrigerate them for at least four hours before serving. Your patience will be rewarded!
Final Thoughts
Making the *Best Lemon Marbled Cheesecake Bars* is more than just baking; it’s about creating joyful moments. The process is simple, yet the results are nothing short of spectacular. Each bite is a delightful blend of creamy cheesecake and zesty lemon that dances on your taste buds. Whether you’re serving them at a family gathering or enjoying a quiet evening at home, these bars bring a touch of sunshine to any occasion. I hope you find as much joy in making and sharing these treats as I do. Happy baking, and may your kitchen always be filled with love and laughter!
Print
Best Lemon Marbled Cheesecake Bars That Everyone Will Love!
- Prep Time: 20 minutes
- Cook Time: 35 minutes
- Total Time: 4 hours 55 minutes
- Yield: 12 servings 1x
- Category: Dessert
- Method: Baking
- Cuisine: American
- Diet: Vegetarian
Description
Delicious and creamy lemon marbled cheesecake bars with a buttery crust, perfect for any occasion.
Ingredients
- 1 ½ cups graham cracker crumbs
- ½ cup unsalted butter, melted
- 2 cups cream cheese, softened
- 1 cup granulated sugar
- 3 large eggs
- 1 teaspoon vanilla extract
- ½ cup sour cream
- ½ cup fresh lemon juice
- 1 tablespoon lemon zest
Instructions
- Preheat the oven to 325°F (160°C).
- In a bowl, mix graham cracker crumbs and melted butter until combined.
- Press the mixture into the bottom of a greased 9×13 inch baking dish.
- In a large mixing bowl, beat the cream cheese and sugar until smooth.
- Add the eggs one at a time, mixing well after each addition.
- Stir in the vanilla extract, sour cream, lemon juice, and lemon zest until well combined.
- Pour half of the cheesecake mixture over the crust.
- Drop spoonfuls of the remaining cheesecake mixture on top and swirl with a knife to create a marbled effect.
- Bake for 30-35 minutes or until the center is set.
- Allow to cool, then refrigerate for at least 4 hours before cutting into bars.
Notes
- For a stronger lemon flavor, add more lemon zest.
- These bars can be made a day in advance for better flavor.
- Store leftovers in the refrigerator for up to 5 days.
Nutrition
- Serving Size: 1 bar
- Calories: 250
- Sugar: 18g
- Sodium: 200mg
- Fat: 15g
- Saturated Fat: 9g
- Unsaturated Fat: 4g
- Trans Fat: 0g
- Carbohydrates: 25g
- Fiber: 1g
- Protein: 4g
- Cholesterol: 70mg